Laman

Kamis, 20 Desember 2012

Photoshop tutorial : Dreamy Effect


Hi everyone!  How is your day going?! ^o^ Hopefully your day is filled with love and always be grateful :)

Okey! In this post, i want to show you how to make your photo seems dreamy effect which using photoshop. Honestly, i'm not the expert of photo editing, hehehe.. I just learned  from some articles and other blogs about photoshop editing that I found on google, and it's so much fun! especially after seeing the results what i made and i love it!>.< That's why I want to share it with you :D

 In this case, the main editing technique that will be used is the lens flare filter. This menu will create circles-light and warm-toned glows effect for your photo. You only need photoshop software which have installed in your computer and of course, your photo file! hehe.. (I took my lovely niece photo for this :* )

1. Open your photo file in windows photoshop (file > open) and duplicate your background layer (Ctrl +J)


2. (Filter > render > lens flare) for this photo, I choose the 50-300mm Zoom Lens, increased brightness to 150%, and positioned the flare to the top left. Click OK in the dialog box.


3. Add a curves adjustment like the one below (image > adjustment >curves).


4. Click create new fill or adjustment layer at the bottom of the panel group, and choose solid color. after the dialog box has been opened, change to be #c38d6a for the color and then click OK. Blend mode "Soft light" at panel group.


5. (Layer > New adjustment layer > photo filter), Click OK. Change color to orange and click OK. Use the slider to select density, I choose warming Filter (85) at 50%. and then click OK again. Now,You can play around with the opacity of the layer, I put it down to 45%, it depends how smooth or strong you want the effect to come out.


6. (Layer > New adjustment layer > photo filter) Click OK. After the second dialog box has been opened, select density that you want (i choose at 15%) and click OK.


7. (Layer > new adjustment layer > levels). Use the sliders to play with levels on your photo that you desired.


8. (image > adjustment > curves). For the last step, you don't have to through it. I did it because i want my photo seems brighter, it depends on what  effect of your photo that you want to show.

 
So, once more i say, you can change anything slightly to change the desired effect. ;)
So here is the final result!


I hope you enjoyed this tutorial!


Sabtu, 08 Desember 2012

Necklace on Packaging!


Some time ago, I thought to make a simple packaging with a touch of vintage for my stuff and finally has been realized :D
Now, I'm excited and much more nervous when talking about this project, hehehe .. but this is one of a bunch of my dreams ^o^  so I tried to dare myself to do it [Sigh]. bismillah. Wish me luck! :D


Rabu, 14 November 2012

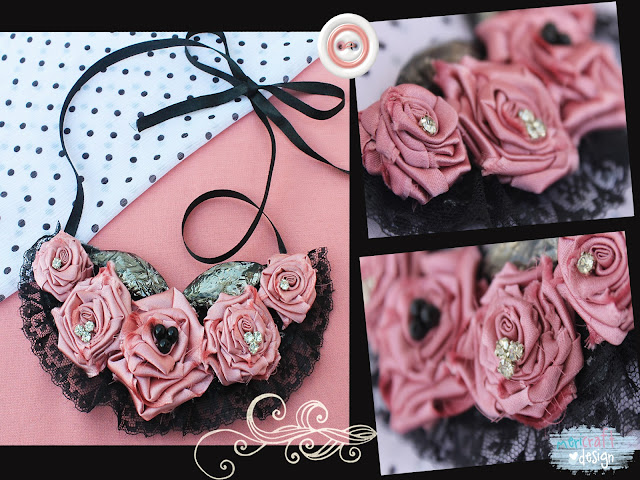
DIY : Rolled Roses Bib Necklace


I don't know  when I exactly liked rolled roses bib necklace because honestly, i say that I am a person who likes things simple and rolled roses bib necklace obviously isn't simple, is it? :D but it doesn't mean I don't want to try it. Did you know because of adding these you look more sweet although keep wearing your simple outfit, so that's why i want to try this one in my outfit :D


Now, lets time to Do It Yourself (DIY) as usual!


Minggu, 21 Oktober 2012

Quote for DIYers!


Anything what i made, it can be inspired from anywhere .. 

And.... i got this quote >>
Power of DIY: 
when you see several details here and there,
and by making it yourself, you mix and match...
JUST THE WAY YOU WANT IT

^o^

Kamis, 18 Oktober 2012

DIY : 'vintage dress' clutch

There are some old clothes belong to my mom that still nice to wear, although a bit smelly and yellowish, but if it had been washed, maybe the people wouldn't think that it was a old clothes :) Unfortunately, the clothes that I found, it was slightly smaller than my size, and there're some short skirts because my mom didn't wear hijab yet at that time, so i couldn't wear all of it because as you know, i'm a moslem who wear a hijab. Was i desperate? No, because i want to keep wear it in another form.
 I persuaded my mom to give me some, and start to makeover that stuff to be something new ^o^


  ^o^


there are some sewing with a machine and the others sewing by hand...

Sssttt... a little secret, this is the first time my work  use a sewing machine, so please be understood that the results aren't as neat as you imagine :p hehehe


Sabtu, 13 Oktober 2012

Songket Part 2 >> DIY : 'Songket' Brooch

Yup, Still with songket!  Actually, there are many things that can be made of it. Fortunately, i still had leftover this fabric (exactly at edge of songket), So, let's create something new again! ^o^

How is that? :D

 with the simple materials..
and step by step..

^o^

Senin, 08 Oktober 2012

DIY : 'Songket' Necklace and Bracelet


Songket! I don't know why I was so infatuated with the fabric pattern on this one. I found it when I was unpacking my mom wardrobe about a year ago, and  finally a few weeks ago, it could be sewn by my aunt to made into a skirt. So i am really excited for it :D

Yeah, this Songket is originally from my hometown, West Sumatera (Minangkabau), Indonesia. 
A bit about Songket, It's a kind of woven traditional Malay and Minangkabau in Indonesia, and other countries such as Malaysia and Brunei. It usually woven by hand with gold and silver threads. and did you know? to create an exclusive songket cloth takes about three months, and for ordinary songket only takes about three days.Wow! and previously, the only royal family who has it, and it usually worn when there are custom ceremonies. So no wonder I called it 'Songket' is Exceptional Heritage.
Currently, when had been discovered synthetic gold thread, the price becomes more varied, ranging from the expensive to the affordable. And now the Songkets are not only for the the royal family, but also can be worn for all of us :D

Songket is usually made ​​into a skirt, but for DIY, I will make it something different. Necklace and bracelet!
Enjoy it! :D


this is the materials that you need for necklace :


Don't forget to prepare :
1. Brooch clips
2. Scissors
3.  Sewing needle
4.  Thread


Materials for bracelet :


for occasion! complete with songket skirt ^o^


Kamis, 27 September 2012

DIY : 'The Sailor' Brooch

When I saw the materials that i had, flashed in my mind to create something that sounds like 'the sailor'.Yeah... in my thought, the sailor uniform, identic with white and black stripes. then, I also had a sisal rope. what for? so let's imagine that my sisal rope as the ship rope. hehehe. the last, the finishing touch that  most representative all of it  is a button that decorated a anchor that I got when buying other materials.

Yup, let's take a look the results of my work!  'The Sailor' Brooch!


How is that? :D
  
 If you want to make it, this is the materials that you need :


Don't forget to prepare :
1.  Hot glue gun
2.  Brooch clips
3.  Scissors
4.  Sewing needle
5.  Thread


I still imagine that sailors actually wearing this brooch. hehehe
How cute imagining! ^o^


Senin, 24 September 2012

'Light Box' Take Brighter Photos


Inspired by the picture of the product online shopping, I was amazed by the photos displayed. I imagine that how to make photos being brighter and make your products looks like online shopping products desirable. could it be? What's the most important part? Yup...Lighting!

 the photos above are the result of taking photos in the light box! unexpected, right? hehehe

So, Make your own light box! ^o^


Related Posts Plugin for WordPress, Blogger...